Your Headline
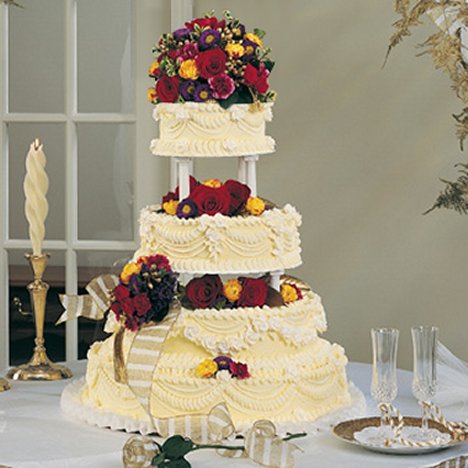
This wedding cake has fresh flowers to adorn a simple, tiered cake. The top of the cake can be designed ahead of time on a floral cage filled with florist foam. You will need to inform your baker that it would be well to insert supporting dowels in the highest cake layer to support the weight of the cake topper.
For this look, you'll need the following fresh flowers and florist supplies:
FOR THE TOPPER:
- 1 Grande Iglu
- 1 clear disposable plate
- 6 Stems Red Spray Roses
- 2 stem Purple Matsumoto Asters
- 1 stem dark purple mini carnation
- 1 White Hypericum Berries
If you need help in designing your cake topper, be sure to watch this video tutorial and read through this step by step Iglu Tutorial. Your cake top is just a smaller version of this tutorial.
SECOND HIGHEST LAYER (Pulled from the Flowers Ordered Above):
- White Stem Wrap
- Double Pointed Toothpicks
- 5 Red Spray Roses
- 1 stem Dark Purple Mini Carnations
- 1 stem Purple Matsumoto Asters
- 1 Stem Salal Leaves
MIDDLE LAYERS OF THE CAKE & SIDE BOUQUET (Both pulled from the flowers listed below)
- White Stem Wrap
- Double Pointed Toothpicks
- 1 stem purple matsumoto asters
- 1 Stem Dk Purple Mini Carnations
- 1 Hypericum
- 2 Stem Red Spray Roses
- 1 Purple Statice
- 3 stems Salal Leaves Tips
- 1 or 2 long Bamboo Skewers
OPTIONAL: #40 Wired Ribbon
Tape the ribbon's cut end to a toothpick with the wire stem wrap. Insert into cake where the nosegay will be placed. Allow ribbon to trail down the cake and onto the table Create a small bouquet and anchor it to the side of the cake. To attach the nosegay to the cake, pierce the nosegay with the skewer and insert the skewer into the cake. It may need a couple of skewers to bear the weight of the small bouquet.
The rest of the flowers are laid on top of a clear disposable plate in the center of the cake. (Note: the clear plates must be laid on the top of each layer while the cake is being assembled. Otherwise it may not fit. Be sure to alert your baker of this when she delivers the cake and begins setup.)

