tall wedding centerpieces
Tall wedding centerpieces are all about the mechanics of the design. You have to be able to make the pieces up separately and then assemble onsite. I watch some of the Youtube tutorials and think in exasperation, "Don't they consider these have to be delivered?"
Think about this BEFORE you jump into designing. Tall vases tumble over easily, breaking off flower stems and coming apart.
Don't feel committed to lilacs only, as this is more of a guide on creating a tall centerpiece. For this look, you'll need the following:
- 30 - 35 Purple Lilacs
- 12 White Lilacs
- 14 Lavender Stock Flower
- 5 - 8 Pale Pink Peonies
- 10 Light Pink Spray Roses
- 1 Tall Flower Stand
- White Florist Clay
- 1 clear 11" Lomey Dish
- Wooden Picks
- Clear Elastic Cord
- 1 Florist Knife
- Oasis Garland or other Bright Creations Garland
- Crystal Clear Flower Food
- 1 Brick Oasis Max-Life Foam
Although it doesn't show, I would strongly suggest you order in a couple bunches of silver dollar eucalyptus. You can get by on fewer flowers if you use some greenery combo packs. Always start at the beginning. That means you need to read through the steps for processing your wholesale wedding flowers when they arrive. This (and the use of the recommended products) is very important, as you will rehydrate your flowers quickly and use certain products that will extend the life of those flowers.
Don't spend all this money on flowers and avoid a few reasonably priced products in order to cut corners. Professional florists know the value of these products and they use them - even when they have large flower coolers to store the designs in. Your flowers arrive fresh from the farm, but they are tired and thirsty and need to be processed immediately upon arrival for them to stay beautiful all up and through your wedding day!

It's better to design first on a clear Lomey Dish, deliver all the components to the venue, and then lift the plate up and rest it on top of the tall stand, pressing down firmly so it attaches to the vase with Florist Clay. This creates a solid bond, yet can be pried apart later and reused as a different style of design.
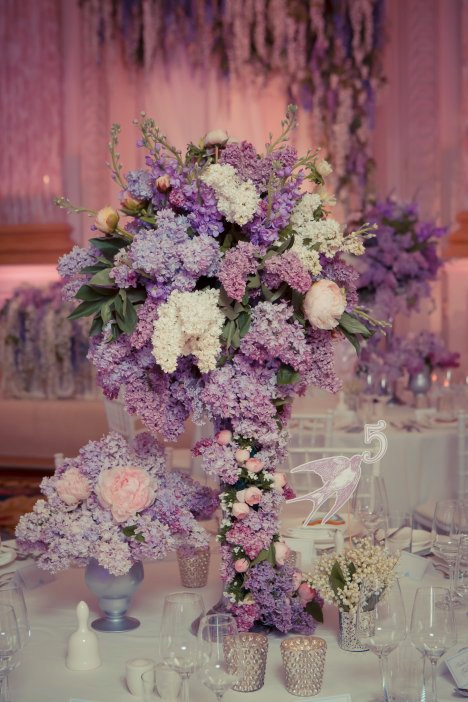
This dreamy look has a flowing spray of lilacs at the top and then a tumble of flowers come down the side of the vase and rest on the table. Use the clear elastic cord to attach several wooden picks, tied to the garland. Insert the wooden picks deeply into the foam AFTER you've made sure the Lomey Dish is securely attached to the top of the vase.
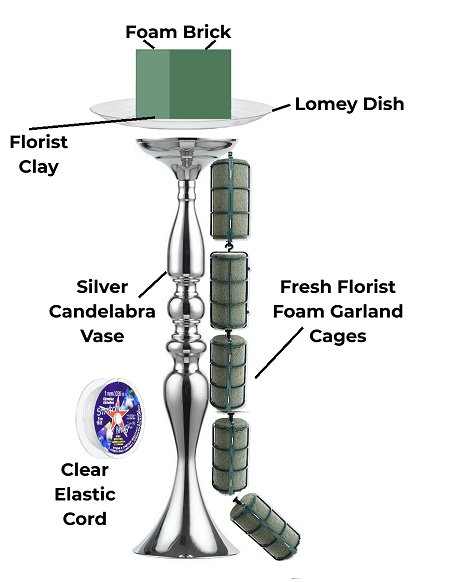
Let's take a look at the different pieces needed for this design. Start with an Oasis Standard brick of Max-Life foam. I like to cut as large of piece as possible to fit on top of the clear Lomey plate. Using flowers like peonies and lilacs all have one thing in common - they are a very thirsty flower. Don't forget to re-add water each day, dribbling it on the foam. Those live flowers will drink a lot of water every day and you have to be sure that the brick of foam doesn't go dry.
If you want to save money, learn how to make your own fresh foam garland with chicken wire in a similar tutorial.

Choose a stand that is sturdy. Those slender empire vases look amazing, but take note that they usually have a small amount of flowers or a large amount of Ostrich Feathers. This is because those types of vases can become top heavy and topple over easily. You need a solid wide base if you wish to elevate fresh flowers. That water soaked foam and flowers is heavier than you think.
Flowers winding around the base or draped down by the side is usually a separate garland and attached on site. Make sure those foam tubes are securely fastened together (don't just trust those flimsy plastic hooks) with chenille stem or clear elastic cord. You also want to bind that tail of flowers to the vase once on the table. The clear elastic cord is almost invisible, but very strong. Tie the flowers between a couple of the tubes directly to the metal vase.
The last is to think either tall or low. A 15 inch tall vase is going to put a large mass of flowers right smack dab in middle of the table, making eye contact very difficult to do while your guests are conversing over their dinner plates. Either make your arrangements low enough to see over or tall enough to see under.
Don't be afraid to substitute other types of flowers. Maybe lilacs aren't your thing (or even in season during your wedding month!) This kind of mechanics can do for any types of flowers.
Read through the other step by step tutorials for elevated centerpieces.
