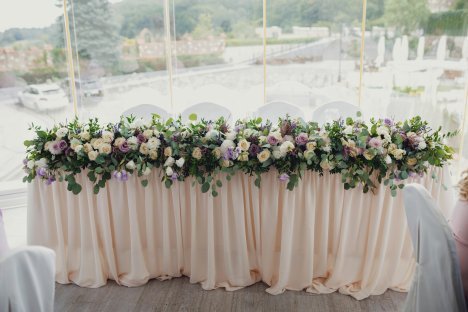
reception table decoration
This lovely reception table decoration is designed using long Oasis Raquettes Florist foam. The creamy whites and light lavender flowers are gorgeous. If you are designing them yourself, think ahead to your delivery requirements. You can design as smaller pieces that are placed end to end to create one continuous flower decoration. Just be sure to reserve a few greens and flowers to create overlapping from one arrangement to the next after setting the reception decoration on the table.
Detailed tutorial explaining the Oasis Raquette can be found among my centerpiece tutorials. You will need to add more flowers and foam if your table is longer than 6 foot.
For this design, you'll need the following products and flowers:
- 4 18" Oasis Raquettes for 6 ft. table OR 2 36" Raquettes for 6 ft table
- 1 Floral Knife
- Finishing Touch or Crowning Glory Flower Sealant
- Crystal Clear Flower Food
- Floralock Stem Adhesive
- 10 stems lavender Lisiantus
- 30 White Lisianthus
- 15 stems green Huckleberry
- 5 stems Italian Ruscus
- 40 Peaches and Cream Roses
- 10 Stems of Lavender
- 5 Stems Lavender Spray roses
- 30 stems Silver Dollar Eucalyptus
- 10 stems Limonium
- 10 Cream Destiny Dahlias
- 10 Lavender Roses
- 10 Lavender Cushion Poms

Before you order wedding flowers online, be sure to browse through the directions for processing flowers correctly. It's important that you treat your flowers immediately upon arrival. Please don't skip the professional products. They are reasonably priced and contribute a great deal to having your flowers stay fresh longer.
If you have never designed flowers before, browse through the step by step tutorials for head tables. You can see step by step photos for designing on Oasis Raquettes. Be sure to allow the foam to float soak, meaning that you let the bars sink slowly into the water treated with the right amount of fresh flower food. Before inserting the flowers, make sure you have the hard plastic plate as the base. This tray will help protect the table cloth. These design tips will have you turning out a stunning reception table decoration like the one pictured above.
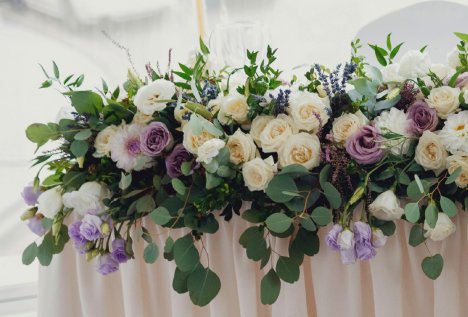
Here's a closer look at the flower design:

As you can see, some of the creamy white flowers are in clusters, creating a random look rather than a perfectly spacing of the colors. I usually green in first, allowing the eucalyptus to drape in long, hanging lines. Add more flowers or space out more if you want the flower colors facing the wedding party side.
Don' cut the lavender spray roses apart, instead inserting the as a mass of smaller flower heads. This gives you a contrast of flower head sizes as well as color contrasts.
This design would look lovely in other color combinations or flower varieties. Simply substitute other color flowers stem for stem, matching the approximately sized heads as substitutions. You can cut down on costs by using carnations and cushion mums instead of roses and dahlias. The creativity is up to you.
Once the design is complete, shake the Floralock can thoroughly, to completely aerate the glue. Spray in small bursts by carefully inserting the red nozzle between the flower heads and aimed at where the stems are inserted into the foam. Spray in short bursts. Don't overdo, or you'll have glue running down the sides. This flower adhesive helps keep the flower and greens in place during handling and transportation.
Mist well when finished with the design, then once again before delivery. Keep in a cool area with a cool mist hydrator running and the lights off. Keep away from heating vents or sunlight through windows. I generally have greened in on Wednesday, flowering on Thursday and delivery on Friday (if your venue will allow you to place the night before).
